Studio Lighting for Beginners: Getting Started with Artificial Light in Portrait Photography
Studio Lighting for Beginners: Transitioning From Natural Light to Artificial Light in Portrait Photography
Moving from natural light to studio lighting is one of the most common questions I read from photographers in my free Build and Bloom Facebook community, and it's easy to see why it feels like a big leap. Between the price tags, the technical-sounding jargon, and the fear of ruining a whole session, studio lighting can feel like something reserved for photographers with a science background, not someone just trying to learn one new skill.
In this guide, I'm breaking down exactly how I use studio lighting in my own portrait sessions, from the affordable equipment I use to the camera settings, to the one $50 piece of gear that makes a one-light setup work almost as well as two. Everything here comes from my actual workflow, not a spec sheet.
One quick housekeeping note before we dive in. These lights are technically called flashes or strobes (you might also see the word trigger tossed around for a related piece of gear), but I'm not going to use those words for most of this post, because when beginners hear "flash," they picture the little flash that pops up on top of a camera, and that's a totally different thing. So to keep it simple, we're just calling them lights.
You can watch the video version of this blog post on YouTube below:

In my guide, you'll learn:
What studio lighting actually is, and where it fits next to speedlights and continuous lights
Why learning studio lighting can change what you're able to charge for and offer as a photographer
The real gear differences between two popular systems, with an honest price breakdown
How to set your lights and your camera without touching a single confusing menu
Why a $50 reflector might be the most useful thing in your bag
A step-by-step look at real studio lighting setups you can copy
This post stands on its own, so if you haven't watched the video version yet, you don't need to. And if you have, consider this your written reference to come back to.
What Is Studio Lighting? (And Why We're Calling Them "Lights")
Studio lighting, also called artificial lighting, is any light source you control and place yourself, instead of relying on the sun or whatever's already in a room. The two most common types you'll come across are strobes and flashes, which are really just two names for the same category of equipment: a light that fires a short, bright burst at the exact moment you take your photo, rather than staying on continuously.
That's different from an on-camera flash, which is the small pop-up or hot-shoe-mounted flash a lot of beginners already own. On-camera flash is a single, small light source attached directly to your camera. Studio lighting is a full system: one or more separate lights, positioned wherever you want them in a room, that you control from behind your camera.
Types of Studio Lights (And Which One This Guide Covers)
If you start shopping around, you'll run into a few different categories. Speedlights are the small, battery-powered flashes that mount on your camera's hot shoe, great for shooting on the go but limited in power. Continuous lights, often LED panels, stay on the whole time you're shooting, kind of like a very bright lamp, and some video shooters like them because what you see is what you get. Strobes, also sold as monolights, are the all-in-one units this post is about. For the rest of this post, I'm just calling all of it "lights," because that's the least confusing word for someone starting from zero, and if you go shopping and see "strobe" or "monolight" in a product name, now you know it's the same thing.
Artifical Lights for Photographers: Why It's Worth Learning
Studio lighting is an incredible opportunity to make more money with your photography, and it opens doors that just stay closed when you don't know how to use it. For basically all of photography history, the technical side of this industry has made studio lighting feel so intimidating, with all the jargon and technical talk, that it seems like you need a math and science degree and a license to touch artificial light. That's simply not true. Yes, you can get very technical with it if you want to, but you don't have to, and by the end of this post you're probably going to think, "wait, that's it? All I had to do was turn on the light and change one setting?"
If you're a natural light photographer and a little stubborn about switching, keep reading with an open mind. You can make studio light look like the most gorgeous, big, south-facing window light. I live in Seattle, which means for about half the year I can't count on shooting outside, because it's raining, cold, and it's dark by 5pm. Knowing studio lighting means photographers in the Pacific Northwest, or really anywhere with unpredictable weather, can shoot indoor portrait photography in winter instead of waiting on the sun.
It also lets you scale your wedding photography business, because studio lighting can be one of the key elements that lets you not just offer more in your packages, but solve tricky lighting situations that used to limit you. If you're already charging a solid amount for your wedding packages, artificial lighting is often that next threshold. Beyond client work, it opens up the opportunity to apply for a job with benefits and a salary doing catalog and product photography, or even second shoot boudoir or newborn sessions in another photographer's studio. You simply don't have access to those opportunities if you've never worked with lights.

Learning off-camera flash is a path to making more money.
I've been passionate about teaching photography for ten years now, because it's a real path to extra income, whether that goes toward a vacation, a credit card bill, or getting out of a difficult living situation and gaining independence. Adding studio lighting on top of that widens the door even further. And yes, I know a post that explains this in plain terms is going to get some comments from people who love gatekeeping. I'm speaking in simple terms on purpose, because I want this accessible to more photographers, not fewer. That's kind of my whole thing, making photography accessible to everyone, and that's why I'm not going to make this complicated.
Why Most Photographers Never Learn Studio Lighting
I asked my Build and Bloom photography Facebook community why they hadn't learned studio lighting yet, and the answers were honest enough that I want to walk through them directly.
The most common one was feeling overwhelmed, not knowing where to start, because there felt like too many variables to juggle. This post focuses on one-light and two-light setups only, and by the end you'll see that studio lighting really has one main variable you're adjusting once you're set up: how bright your light is. Right behind that was money, which is exactly why the gear section below includes real prices and a full cost comparison, not vague ranges. A few of you told me you bought nice lights years ago and never learned to use them, sometimes right as you were closing on your first studio space. If that's you, your gear isn't wasted. It's never too late to actually learn what you already own.
Transitioning From Natural Light to Studio Lighting
This one's its own kind of hesitation. A handful of you told me you love natural light, you love your reflectors and diffusers, and you don't want to give that up. You don't have to. Studio lighting, used well, can emulate the exact soft, window-light look you already shoot, and I'll show you real examples of that later in this post.
The Backdrop: Seamless Paper Basics
Before we get into lighting gear, I want to quickly talk about the other star player here: the backdrop. What you see behind my model is called seamless paper, which is exactly what it sounds like, a giant roll of paper that pulls down behind your subject so your background has no lines, no corners, and no seams. Mine is from Kate Backdrops in the 7-foot size (86 inches wide), and I use two colors, baby pink and white.
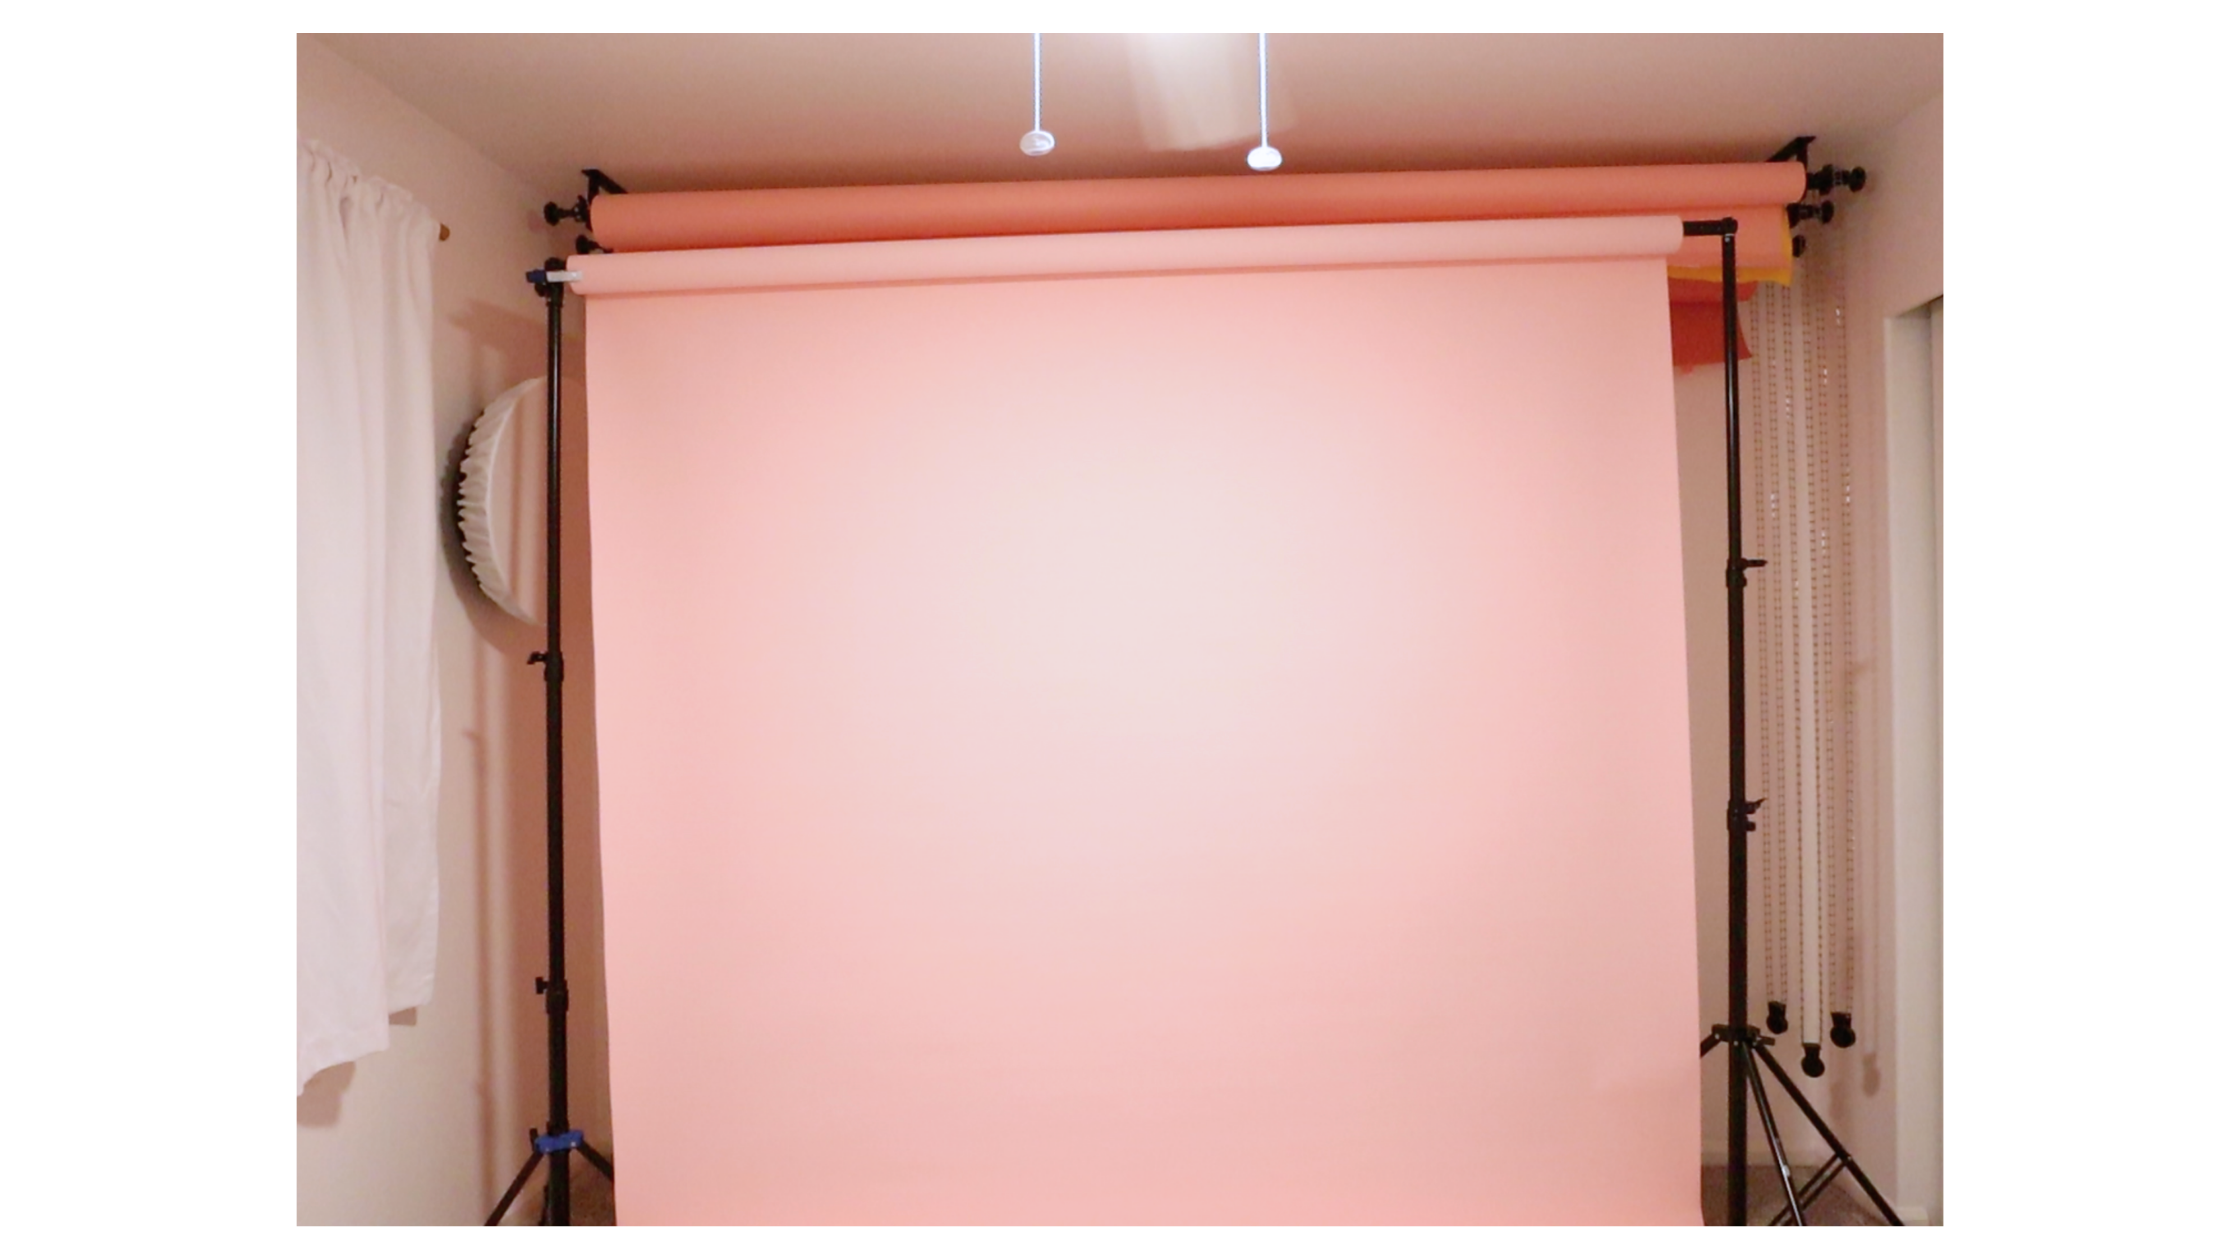
If you're about to buy your very first roll and aren't sure where to start, I made a free guide on which colors to consider first.
As for what holds the paper up, I'll link the portable backdrop stand I recommend below too. In the video, you'll also see my permanent setup, a ceiling-mounted roller system that holds three rolls of paper at once. Mine is a few different pieces I put together myself, but nowadays you can buy that as an all-in-one system too, I'll link one of those as well.
Now let's get into the gear that actually lights all of this.
Studio Lighting Gear for Beginners: Why I Switched From Paul Buff to Geekoto
Before we get into settings, let's talk about gear and price, because money is what holds most photographers back from learning studio lighting, so let's get that fully out of the way. Comparing these two systems is also going to teach you almost every piece of vocabulary you need to shop for studio lights, so consider this the one section in this whole post where we talk jargon on purpose.
I started out on a brand called Paul Buff (also known as Paul C. Buff). They make long-lasting, reliable equipment, and you can find great secondhand deals on Facebook Marketplace. I used Paul Buff because my friend Alena, who taught me studio lighting, had them in her studio, and her lights have lasted her 18 years. Last year, I switched to a brand called Geekoto, and I now recommend Geekoto over Paul Buff.
Corded vs. Battery-Powered: Why I Went Cordless
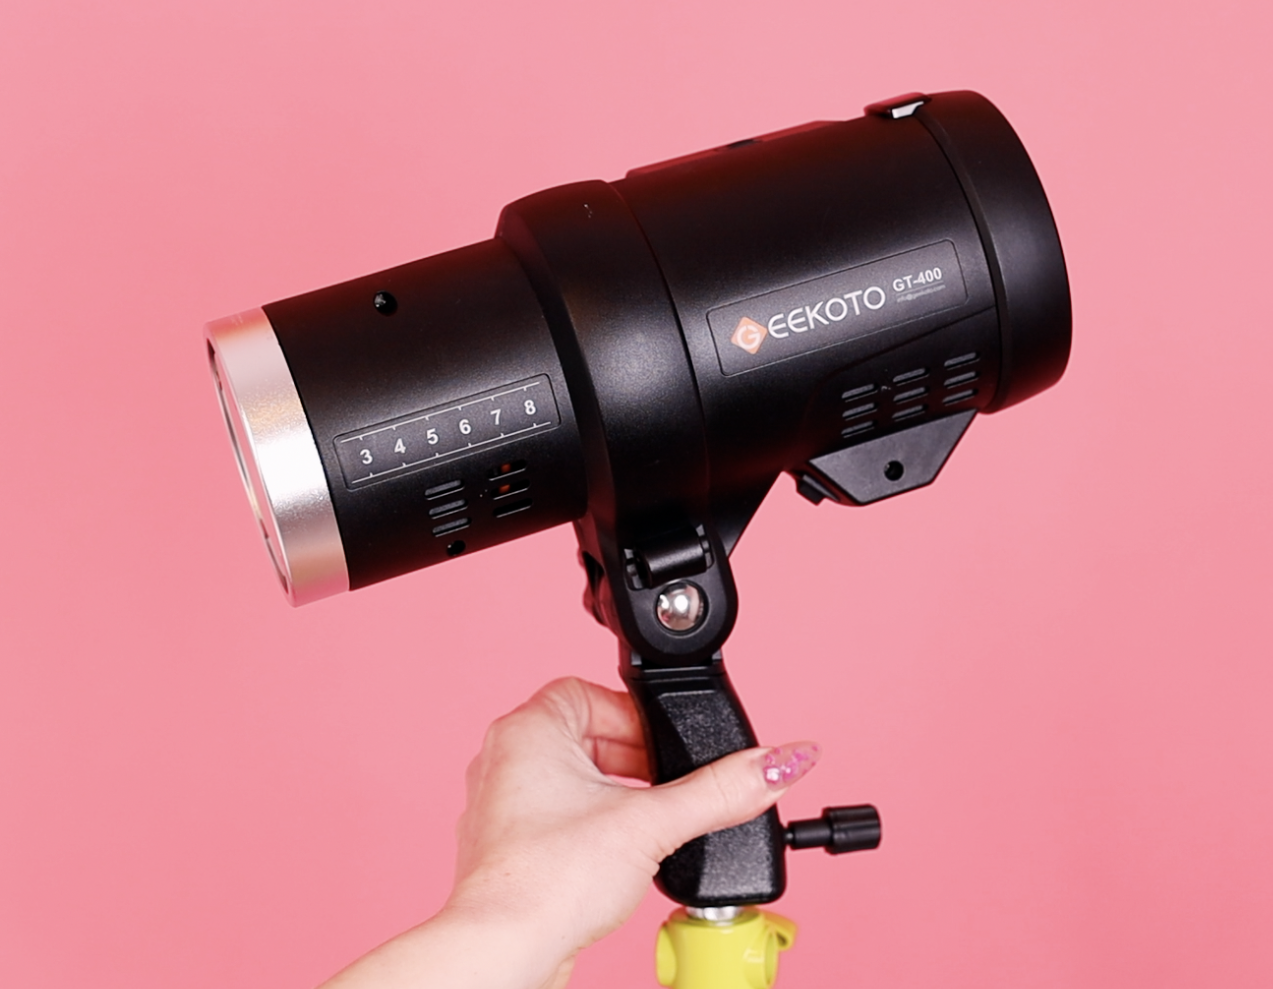
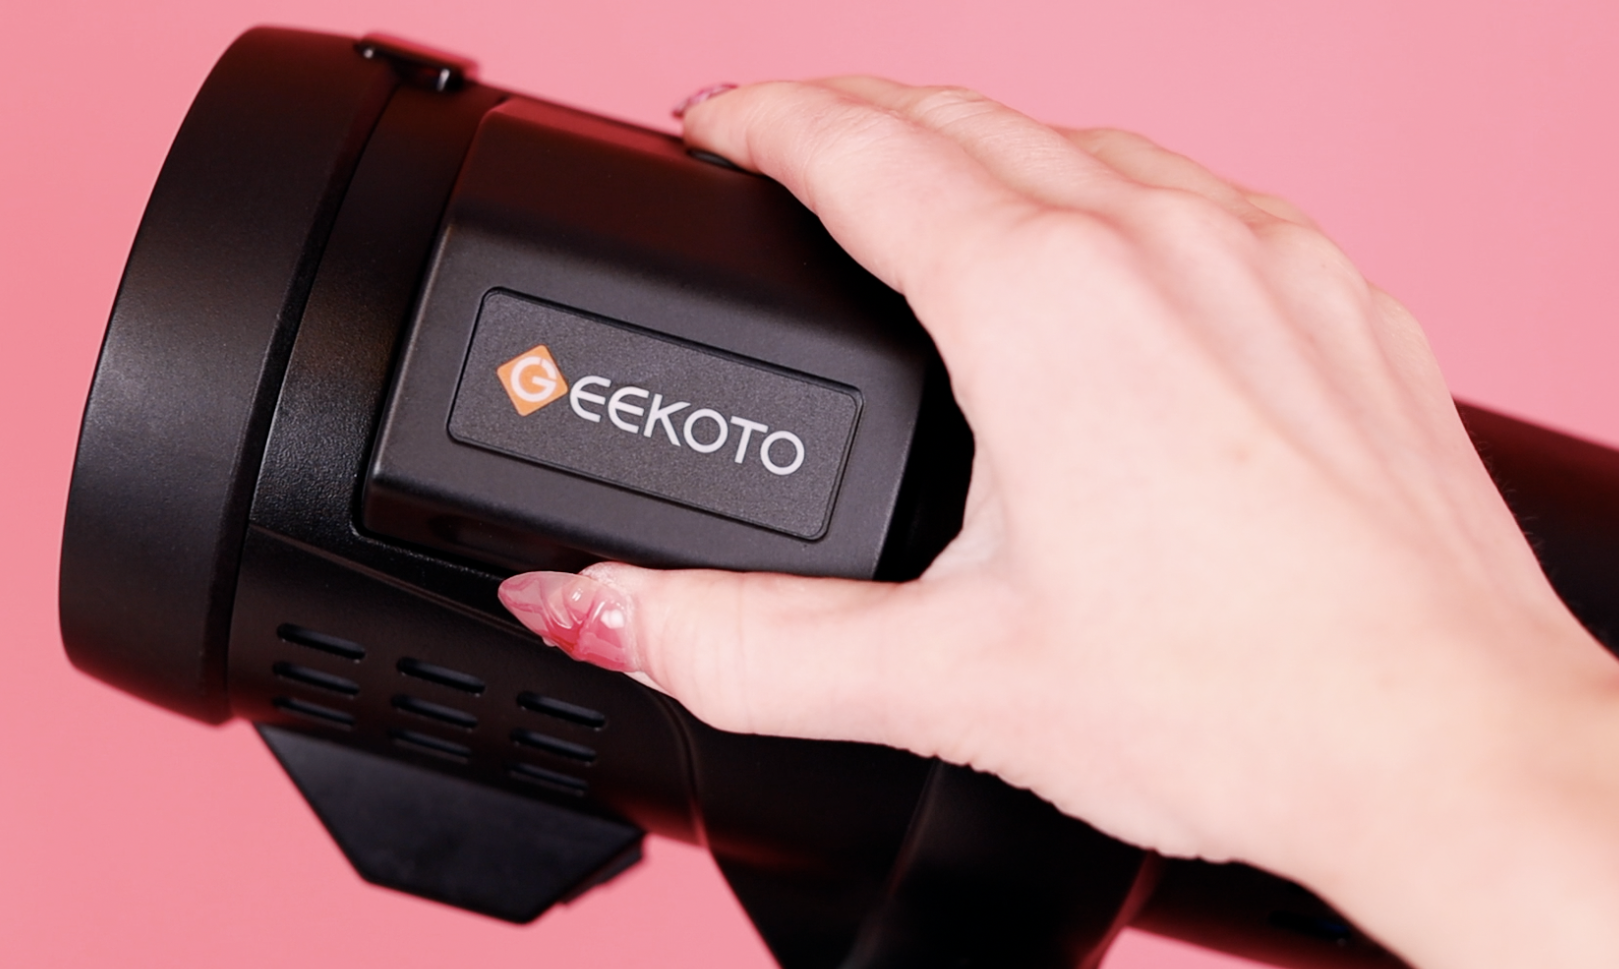
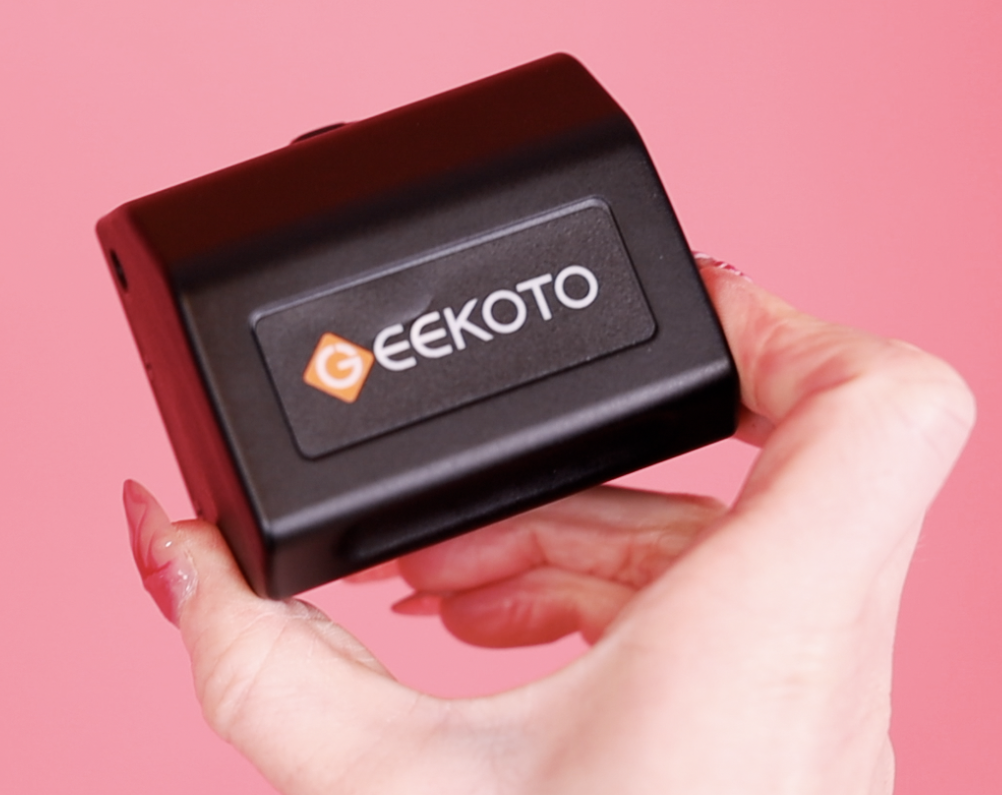
With Paul Buff, the lights are corded, meaning each one has to plug into a wall outlet, so you're always working around cables. If you want to shoot somewhere without outlets, Paul Buff's solution is a separate portable battery pack called the Vagabond, which costs $364.95 on its own, and here's the thing, even with the Vagabond, you're still not actually cord-free, because your lights still have to plug into it with cables, they just end at a battery pack instead of a wall. With Geekoto, the battery is built into the light itself. Nothing plugs into anything. The batteries pop off and can be swapped, so you can always keep a spare charged, and a full charge lasts hours and hours of shooting.
The Vocabulary You Actually Need: Modifiers, Transmitters, and Receivers
Next, modifiers. A modifier is the thing that goes over your light to spread it out and soften it, like an umbrella or a softbox. With Paul Buff, when I bought umbrella modifiers, the umbrella was one purchase, then the diffusion fabric (a white sheet of material that stretches over the front to soften the light even more) was a separate purchase, and the black outer cover (which wraps around the back so light only goes where you want it) was a third separate purchase, per umbrella. With Geekoto, the modifier comes with all of those parts included in one purchase.
[INSERT IMAGE: wide studio shot of two Geekoto softbox/umbrella modifiers set up in the loft studio. Filename: geekoto-softbox-umbrella-modifiers-studio-lighting.jpg. Alt text: "Two Geekoto softbox and umbrella modifiers set up in a home photography studio"]
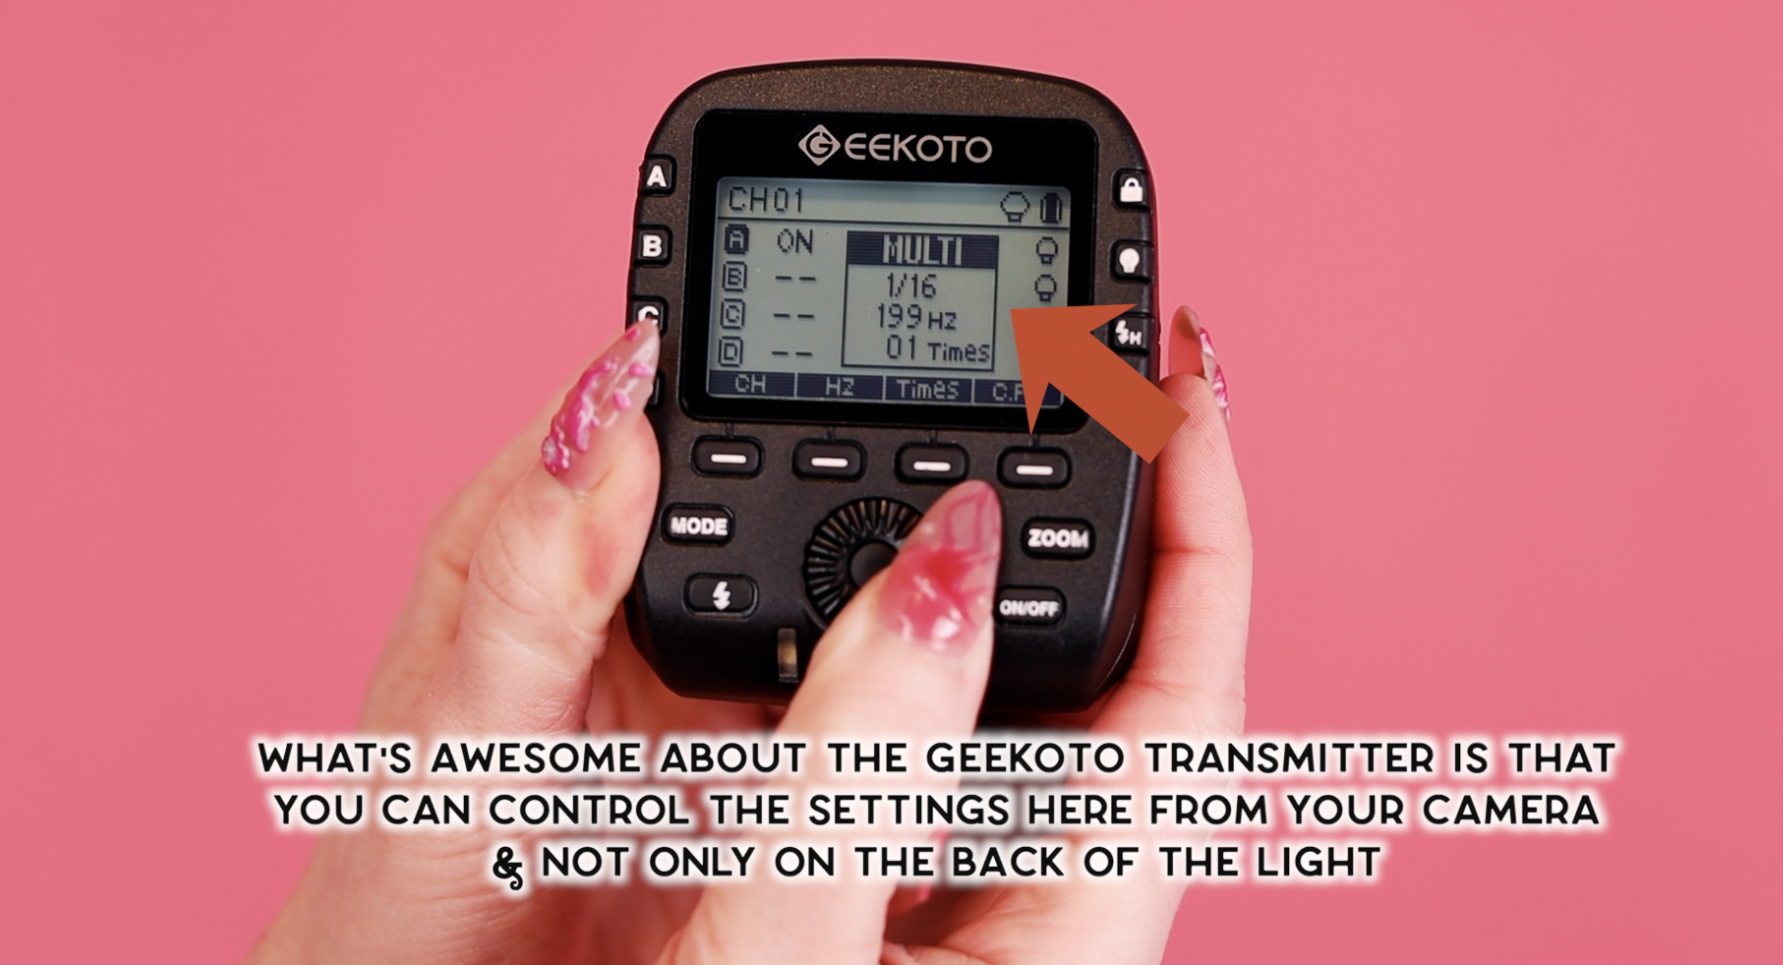
Now, the part nobody explains to beginners: how your camera and your lights actually talk to each other, since there's no wire connecting them, and they still have to fire at the exact same instant you press your shutter. This happens with two small pieces. A transmitter slides onto the top of your camera and sends out a signal every time you take a picture. A receiver plugs into your light and catches that signal, telling the light to fire at that exact moment. They only connect one way, so you can't really get it wrong.
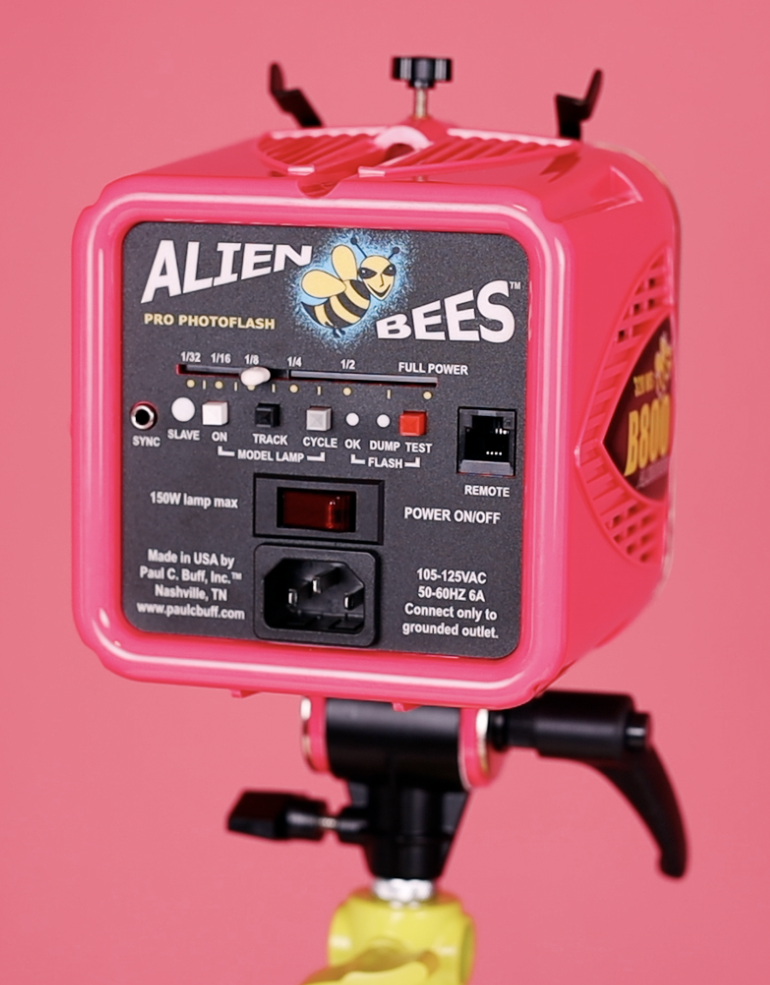
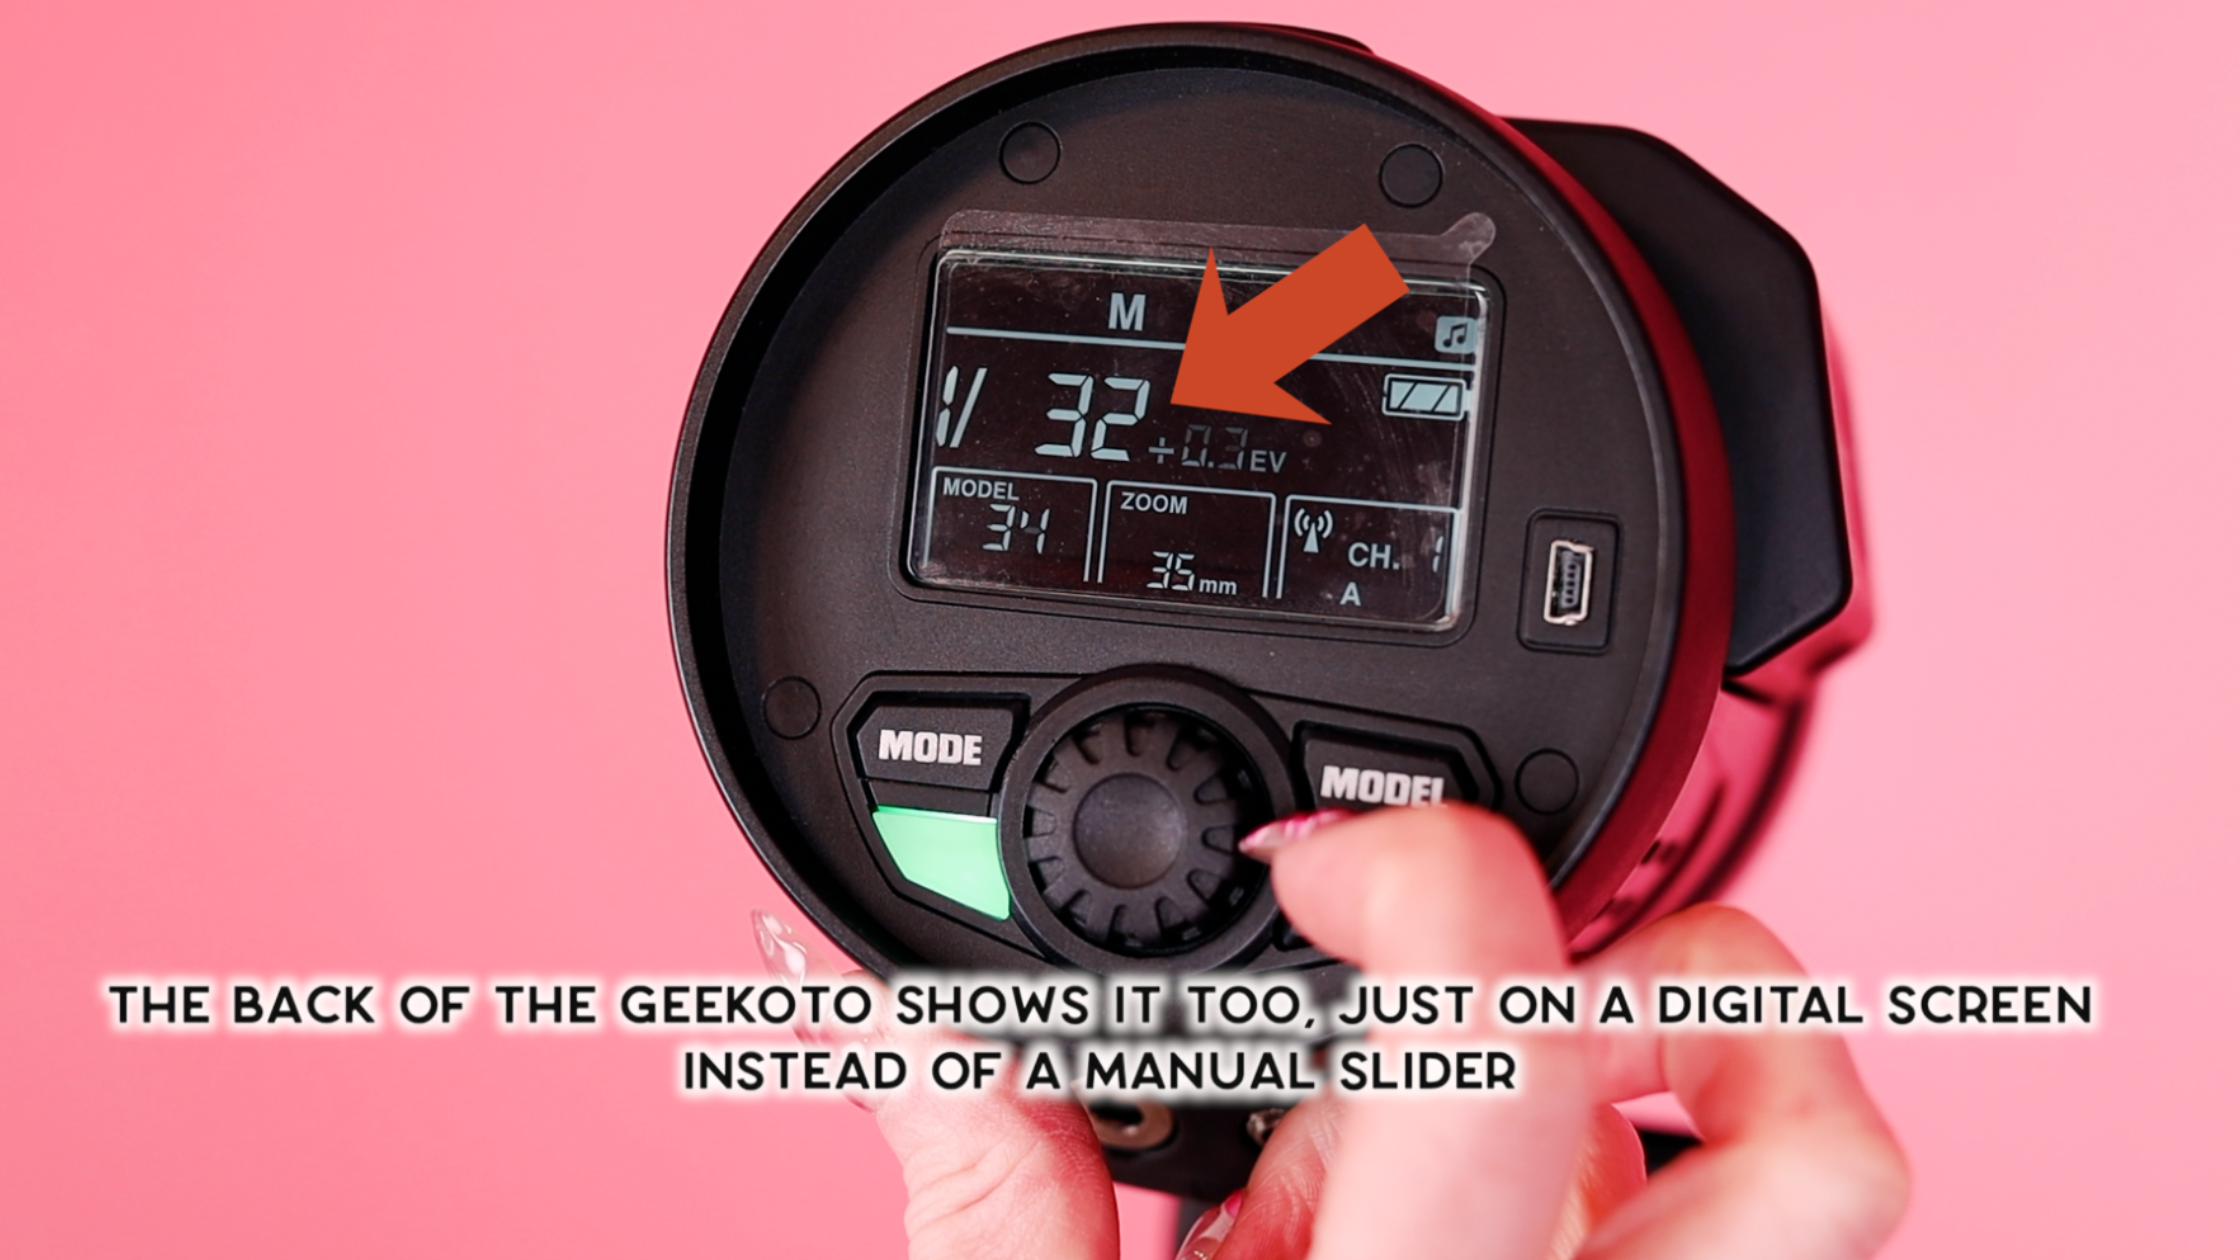
With Paul Buff, the receiver is a separate box you buy and attach. With Geekoto, the receiver is already built inside the light. And the Geekoto transmitter doesn't just tell the lights when to fire, it also controls them. With Paul Buff, if I wanted to change how bright a light was, I had to physically walk up to that light and adjust it by hand, every single time, which is a pain when a light is mounted up high. With the Geekoto transmitter, I can adjust every light from where I'm standing behind the camera, which matters a lot more once you're mid-shoot with a client and don't want to break the flow of the session.

Manually adjusting the power dial on the back of the Paul Buff Alien Bee B800 vs. adjusting brightness remotely on the Geekoto transmitter display.
The transmitter also supports High Speed Sync, a feature that lets your flash keep up with very fast shutter speeds. You don't need it as a beginner, more advanced photographers look for it, but it's worth knowing this system has it so you'll never outgrow it. It runs on regular AA batteries, which I actually prefer. The Paul Buff transmitter is rechargeable, which sounds nicer, but that means carrying a charger, and I've had my Geekoto on the same set of AAs for over a year. If they ever die mid-shoot, I just swap in spares from my bag.
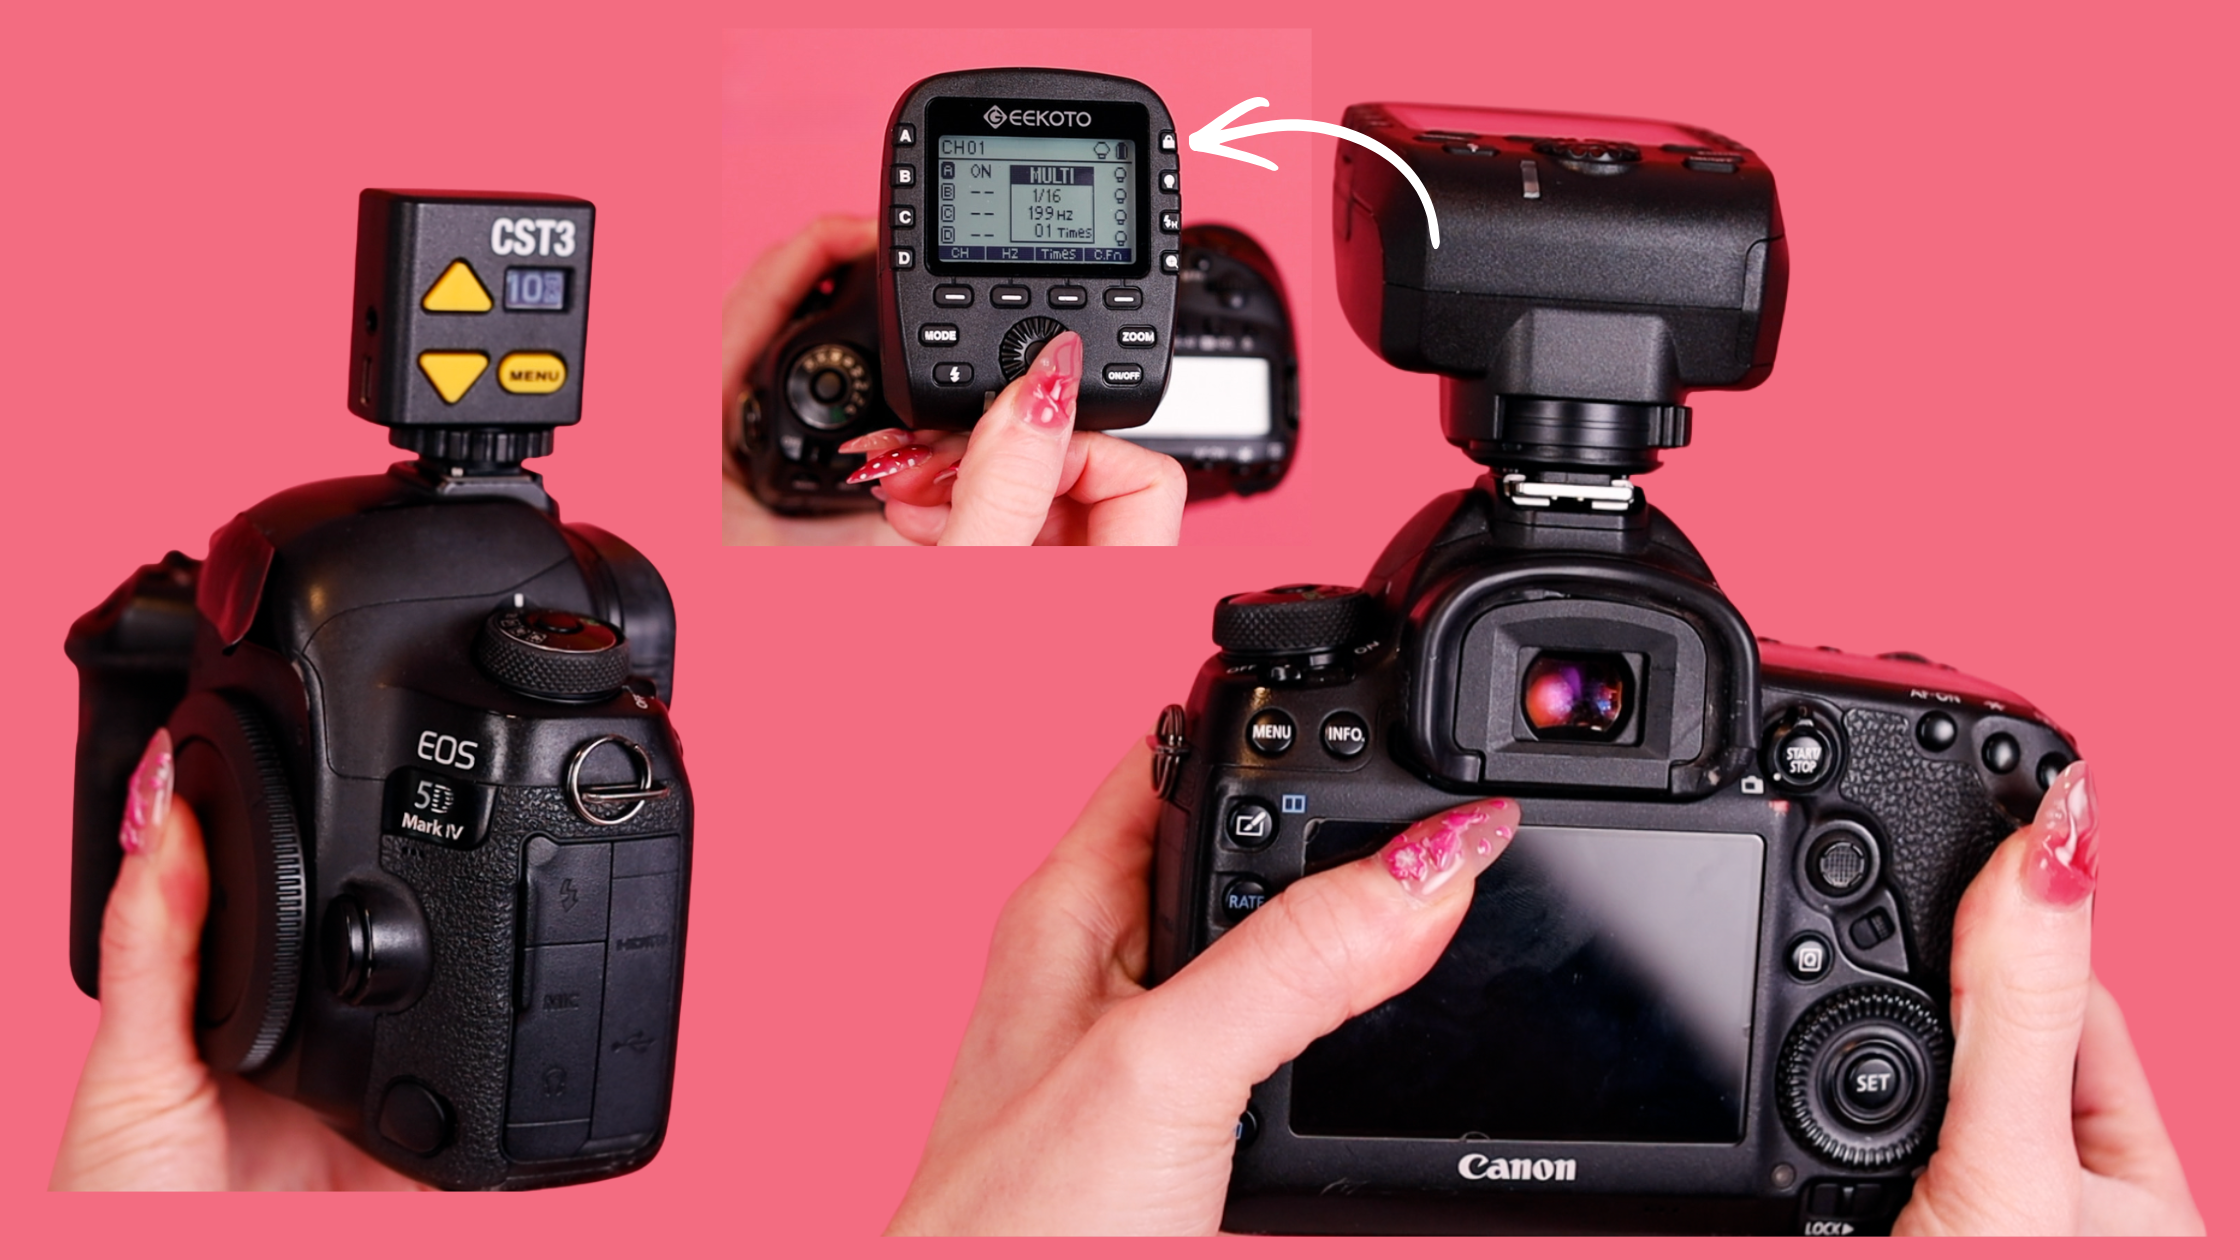
Geekoto and Paul Buff Godox style flash transmitters mounted on top of a camera
At a glance: Paul C. Buff vs. Geekoto
| At a Glance | Paul C. Buff | Geekoto |
|---|---|---|
| Power source | Corded, plugs into a wall outlet | Battery built into the light |
| Cordless option | Vagabond battery pack, $364.95 extra | Included, batteries swap out |
| Modifier parts | Umbrella, diffusion fabric, and outer cover sold separately | All included in one purchase |
| Receiver | Separate box, sold separately, attached per light | Built into the light |
| Adjusting brightness | Walk up to each light by hand | Adjust every light from the transmitter |
| Transmitter batteries | Rechargeable via USB-C | Standard AA |
Best Budget-friendly Studio Lights: Price Comparison
Now let's talk price, since when I asked in my Build and Bloom Facebook group why you hadn't learned studio lighting, money was the number one answer by far. The light I use is the Geekoto GT400. Quick side note, when you see a number like 400 in a light's name, that's referring to its power, you don't need to memorize what that means, just know it's more than enough power for portraits.

| Light | Price (single light) |
|---|---|
| Geekoto GT400 (link here) → | ~$389 |
| Godox AD400Pro / Flashpoint (link here) → | ~$599 |
| Westcott FJ400 (link here) → | ~$599 |
| Profoto B10X Plus (link here) → | ~$2,000+ |
Godox is probably the brand you've seen recommended the most, and Flashpoint is really just rebranded Godox. Profoto, the luxury brand, runs over $2,000 for a single light, which means one Profoto light costs almost double what my entire two-light Geekoto setup cost, lights, umbrellas, and transmitter included. Geekoto can price this way because they own the factory that manufactures their lights. Most other brands pay a separate manufacturer, and that markup gets passed to you.
The Real Cost Comparison: Two-Light Setups
Here's the full math on switching from my old Paul Buff setup to Geekoto, itemized so you can see exactly where the money goes.
| Item | Price |
|---|---|
| 51" umbrella | $60 |
| 64" umbrella | $70 |
| Black outer cover (x2) | $30 + $40 |
| Diffusion fabric (x2) | $22 + $30 |
| Receiver | $70 |
| Transmitter | $75 |
| Two lights ($350 each) | $700 |
| Total | $1,097 |
Geekoto (two GT400 lights, two 48" umbrellas with everything included, plus transmitter): $1,118 total.
That's a difference of about $20, for a setup with no cords at all, and that's actually the point I want you to take from this breakdown, it's not really about the total price. It's about how many separate pieces Paul Buff expects you to realize you need and go buy on your own. If you didn't have someone walking you through it, it's completely reasonable to buy just the umbrella, get everything set up, and then realize you're still missing the diffusion fabric and the black outer cover, which usually means a second round of shipping instead of one order. With Geekoto, all of that comes in the box already. The tradeoff is you don't get the option to remove that outer cover if you ever wanted to, which isn't something most beginners need to worry about anyway.
Why I Recommend Two Lights (If You Can Swing It)
How many lights should you buy? This is coming from someone who's infamously hated spending money on camera gear. I suggest getting two if you can swing it, since a second light gives you more options and you'll grow into it fast. One light absolutely works too, especially paired with a reflector (more on that below), and you'll see a one-light setup later in this post.
Two more things I love about Geekoto before we move on. Their modifiers use a patented design that pops open, pops closed, and folds down completely flat, which sounds small until you're loading a car for an on-location shoot or storing lights under your bed in a small home studio. Almost everything they make also uses recycled materials, down to the tote bags they hand out at WPPI, the big photography conference in Las Vegas, which is actually how I was introduced to the brand in the first place. I'll be honest, my first year on the WPPI floor was a little discouraging, a lot of vendor booths just didn't take me seriously. Geekoto was different. They took the time to show me their products and answer every question I had, no matter how small it felt, and I never forgot that. Now, over a year later, I get to be an affiliate with the brand, which feels pretty full circle.
Studio Lighting Settings for Beginners (This Is the Easy Part)
Now let's talk about the settings on the lights, because I think this is the part people are most scared of, and it's truly the easiest part of this entire post.
Manual Mode vs. TTL
Your light has a few different modes. One is called TTL, which is basically auto mode, the light tries to guess the right brightness for you. Just like you eventually moved off auto mode on your camera, we're not using auto mode on our lights either, because you don't have as much control, and the light's guess changes shot to shot. We're putting the light in manual mode, and we're staying there. And before you panic at the word manual, hear me out: if you can set the shutter speed on your camera, you can set your light in manual mode. It's the exact same skill.
Power Is a Fraction
In manual mode, the brightness of your light shows up as a fraction of the light's full power. 1/1 means full power, the brightest that light can go. 1/2 means half power. 1/8 is an eighth of the power, all the way down to tiny slivers like 1/64. So the smaller that number is, the brighter your light, and the bigger that number gets, the dimmer your light. And if fractions are making your eye twitch right now, here's the thing, you already use them every single day, because your shutter speed is a fraction too. You already know that 1/200 lets in more light than 1/2000. This is that same idea, just for your light's brightness.

Channels and Light IDs: how your camera knows which light is which
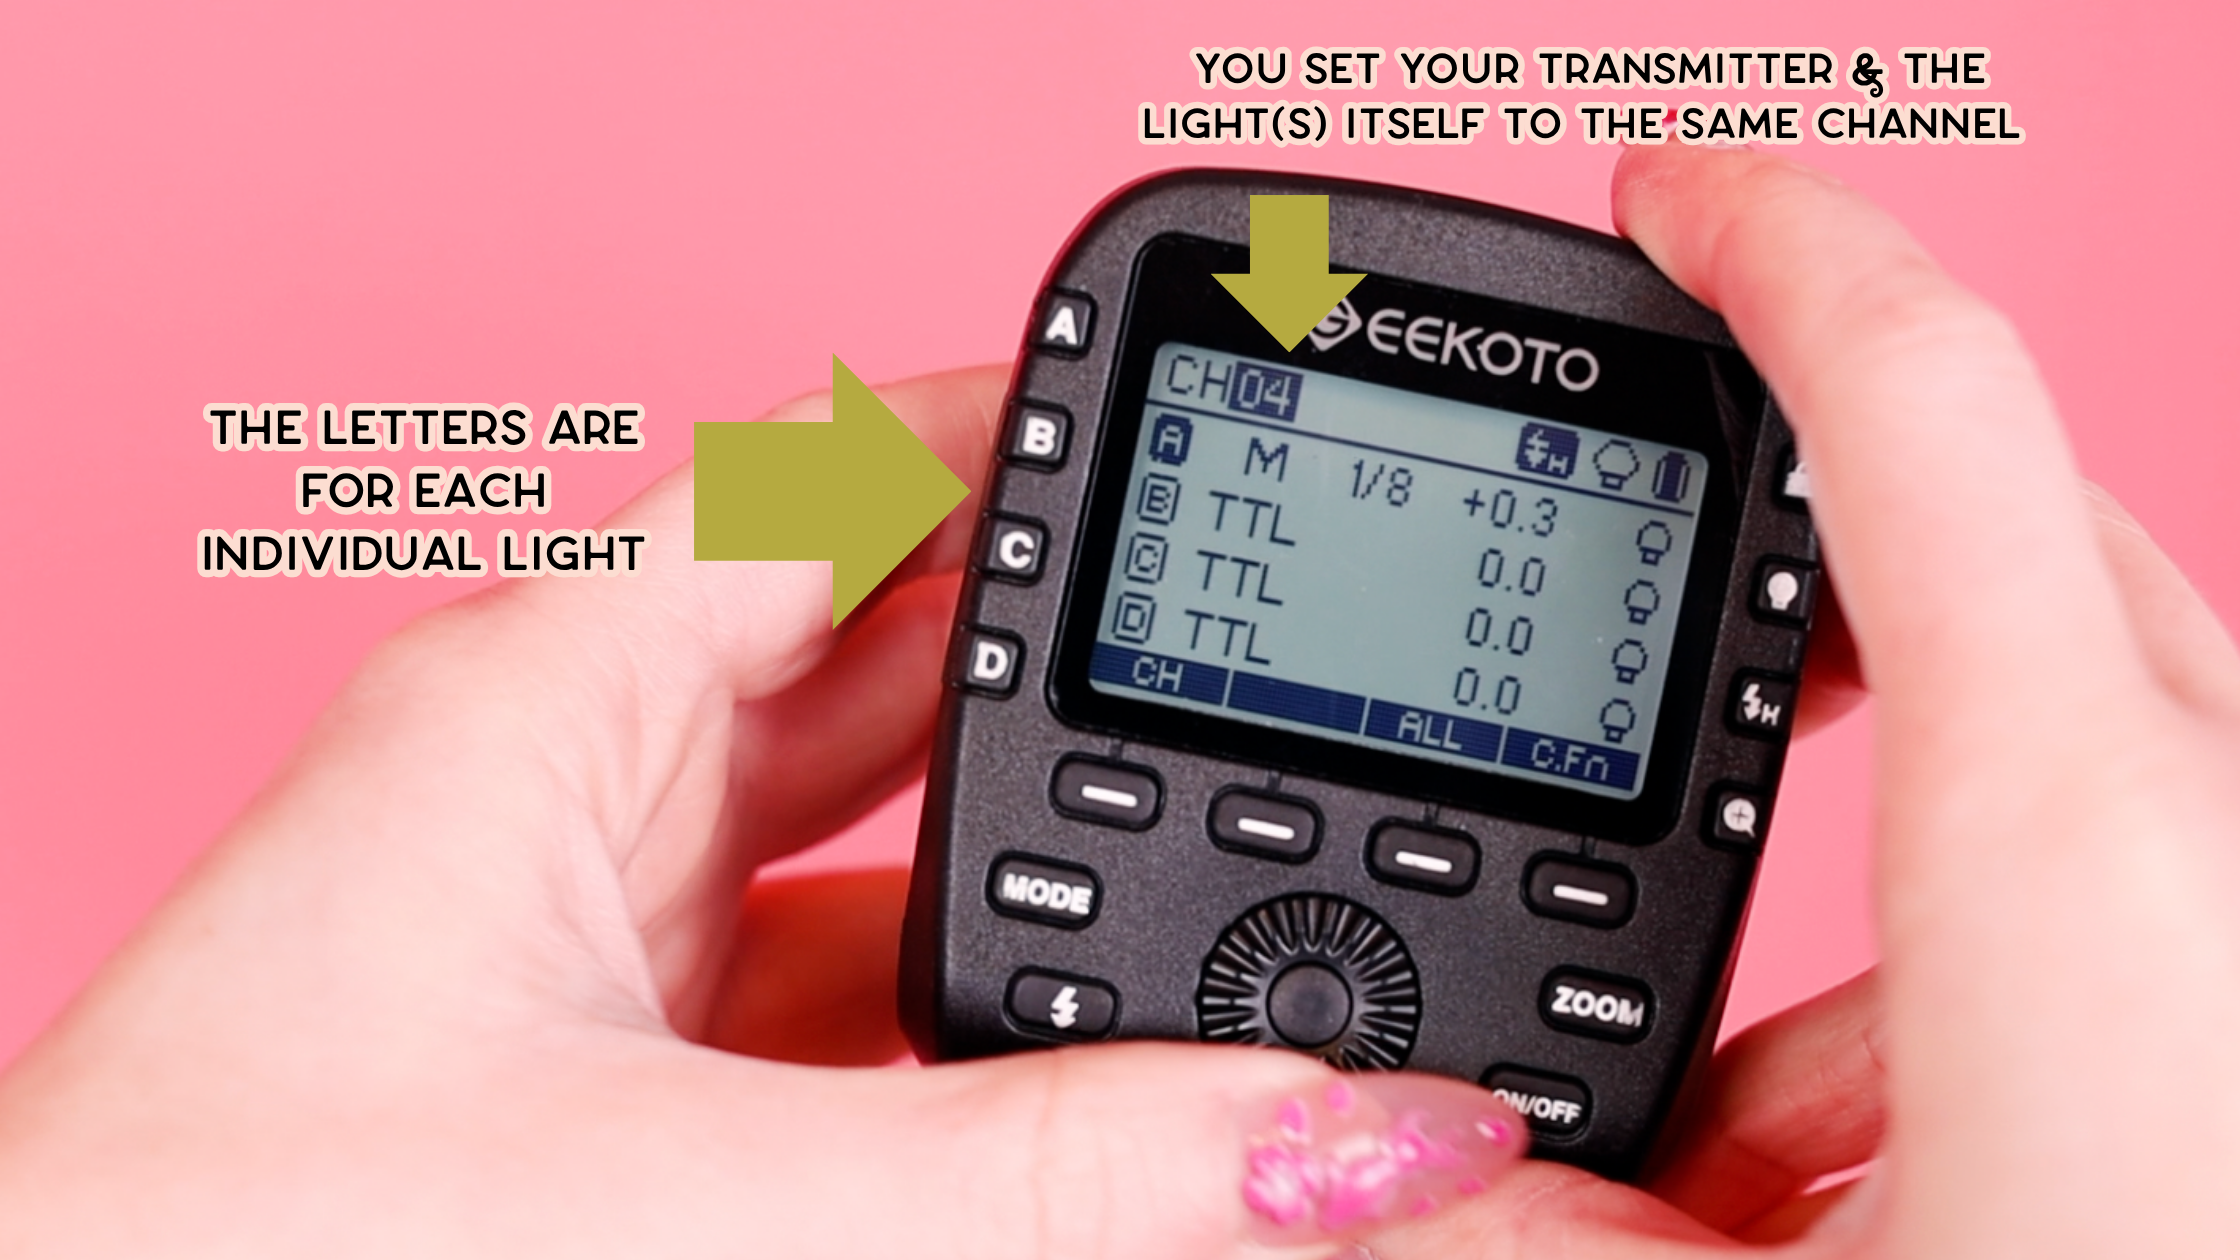
Two quick things get set up once so your lights and your transmitter can talk to each other. The first is the channel, which is basically a group chat that all your lights need to be in. Your transmitter sends the message "fire" to that group chat, and any light in it gets the message. If your transmitter is on channel 1 and your light is on channel 5, that light never got the message, and nothing will fire. So pick a channel, put the transmitter and every light on it, done, it takes about three seconds. The second thing is that each light gets assigned a letter, A, B, C, and so on, which is basically that light's name. That's what lets you control each light separately, so you can tell light A to get brighter without touching light B.
Modifiers and Softness
The bigger the modifier, the softer the light. Soft light means gentle shadows and that flattering, even glow on skin, and you get it by making your light source physically bigger, which is exactly what a modifier does. A 48-inch umbrella is plenty for most home setups. Modifiers can get huge, all the way up to 100 inches, which can look incredible in a big studio but isn't remotely practical for a small home setup, so bigger isn't automatically better, it's about what fits your space.
Camera Settings for Studio Lighting
When it comes to your camera settings, they're basically the same as they'd be without studio lights, with one exception, your shutter speed. With studio lights, your shutter speed can only go as fast as about 1/200. That's the sync speed, the speed limit when you're shooting with flash, and if you go faster than that, you'll start seeing a black bar cutting across your photo, so stay at 1/200 or below and you're fine. For ISO, keep it low, like 100 or 200, because the light is doing the work now, your camera doesn't need to strain to see in the dark. Your aperture is completely your preference. And white balance, set it to whatever you like and don't stress about it, especially if you shoot RAW, since you can change it later in editing.
So here's the settings recipe: shutter at 1/200, ISO at 100, aperture wherever you like it. The only new variable, the only one, is how bright your light is, that fraction we just talked about. Take a test shot. Too bright, turn the light's power down. Too dark, turn it up. That's the whole workflow.
The power dial on the transmitter isn't even the only way to adjust your light, because you can also fix your exposure with your feet. Moving the light closer to your subject makes it brighter, and pulling it further away makes it dimmer. Moving it closer also makes it softer, because the closer that big umbrella gets to your subject, the bigger it becomes from their perspective, and bigger means softer. So closer equals brighter and softer, sometimes the fix isn't a setting at all, you just scoot the light a foot.
Most studio lights also have a button called a modeling lamp, which helps you see where your light is falling, kind of like a preview. It's not a continuous light and you can't use it as one, it's very weak, so if you were hoping to use these for video lighting, that's a different tool. The modeling lamp helps you set up your shot, the flash is what actually lights your photo.
Can You Mix Brands of Studio Lights?
One last thing before we head into the studio, because I know someone's going to ask: what if you want to mix brands of lights? For me, I have two Geekoto lights and two Paul Buff lights, so what if I want to shoot with three lights at once, my two Geekotos and one Paul Buff? Yes, they can absolutely work together.
Your lights will have a setting called optical sync, on some lights labeled S1 or S2. When it's on, that light literally watches for a flash, and the instant it sees your other lights fire, it fires too, right in the same photo. You don't add it to your channel or set anything up, you just turn the light on, flip on optical sync, and it joins in automatically. The light needs to be able to see your other lights flash, which in a normal room is never an issue, and you'll adjust that light's brightness on the light itself, since your transmitter only controls its own brand.
So yes, this was a lot, and I'd actually recommend reading this section again. But when it comes to the light itself, it's literally one extra setting: the power of the light. Someone in my Facebook group told me the multiple variables were what overwhelmed them. Well, this is all of the variables. You put your lights on the same channel, which takes three seconds. You give each light a letter. And you might not ever need to touch the channel or the letters again, unless you accidentally bump something. After that, you're adjusting one single thing, how bright the light is. That's it. That's what's been dressed up in jargon all these years.
How to Use a Reflector in Studio Photography (Your Secret Weapon)
Before we walk into the studio, I need to introduce you to the cheapest and most underrated piece of gear in this entire post: the reflector. A reflector is exactly what it sounds like, a big panel, usually a collapsible fabric disc, that doesn't plug in, doesn't have batteries, doesn't have a single setting, and its whole job is to catch the light coming from your studio light and bounce it back onto your subject. It's the one piece of gear here with zero learning curve, and it's going to do some heavy lifting for you.
What Size Reflector Should You Buy?
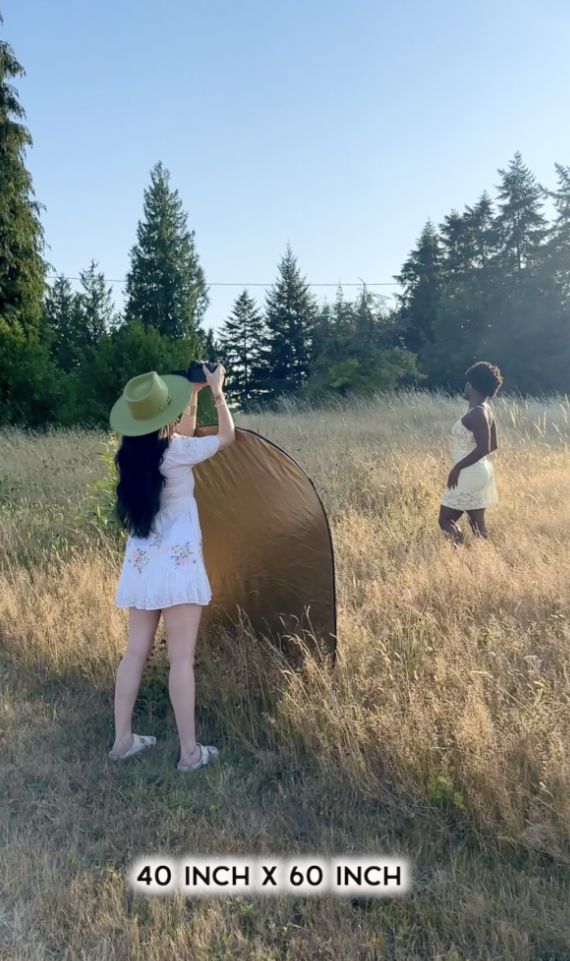
Reflectors come in different sizes, and my advice is to go big. Mine is 40 by 60 inches, which is what I recommend, because the larger the reflector, the more light you have to play with. A tiny reflector bounces a tiny bit of light onto one spot, which can be helpful to have in your camera bag, but a big one wraps light back across your subject's whole face and body.
Which Reflector Color Should You Use?
Most reflectors are also reversible, with different colored surfaces that bounce light differently. The white side gives you a soft, gentle bounce. The gold side adds a warm, orange-y tone, which can look nice outdoors but tends to look fake with studio light. Some reflectors also come with a black side, which actually absorbs light instead of bouncing it, and a translucent panel you can shoot light through, you can ignore both of those for now. The side you want to use is the silver side, because silver bounces back the most light with the most punch, and it keeps the color of the light clean and neutral, which is exactly what you want with studio lights.
Why a Reflector Matters So Much
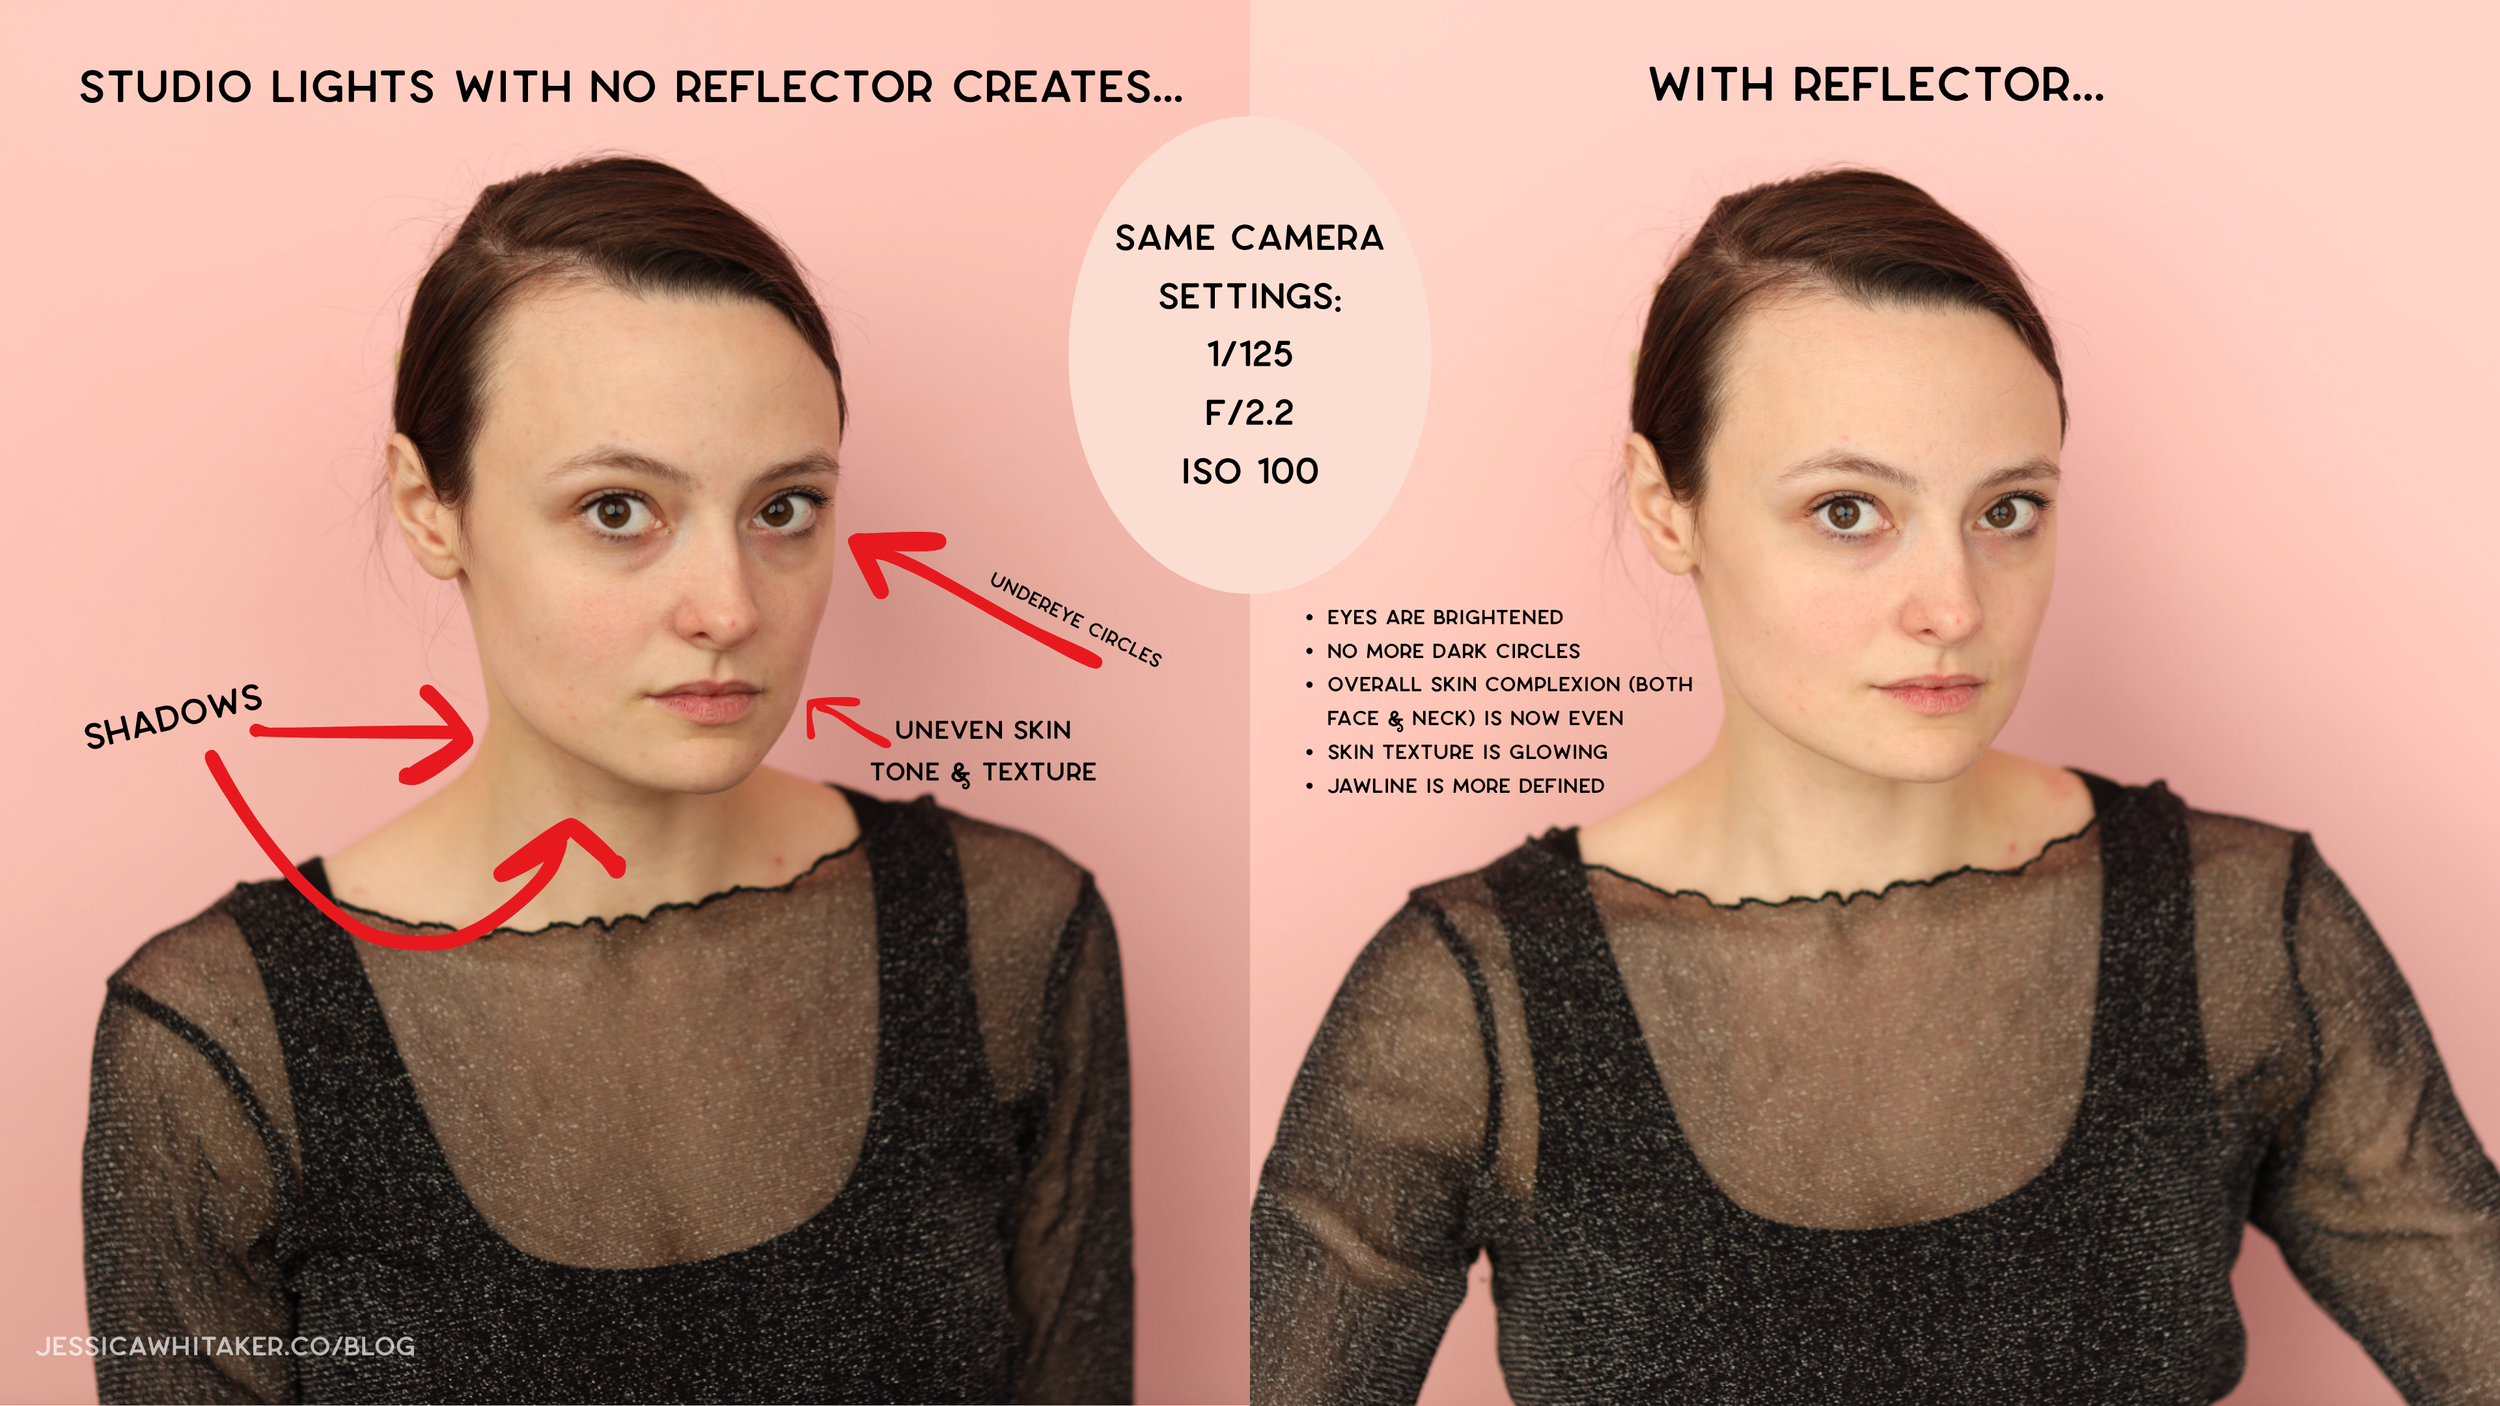
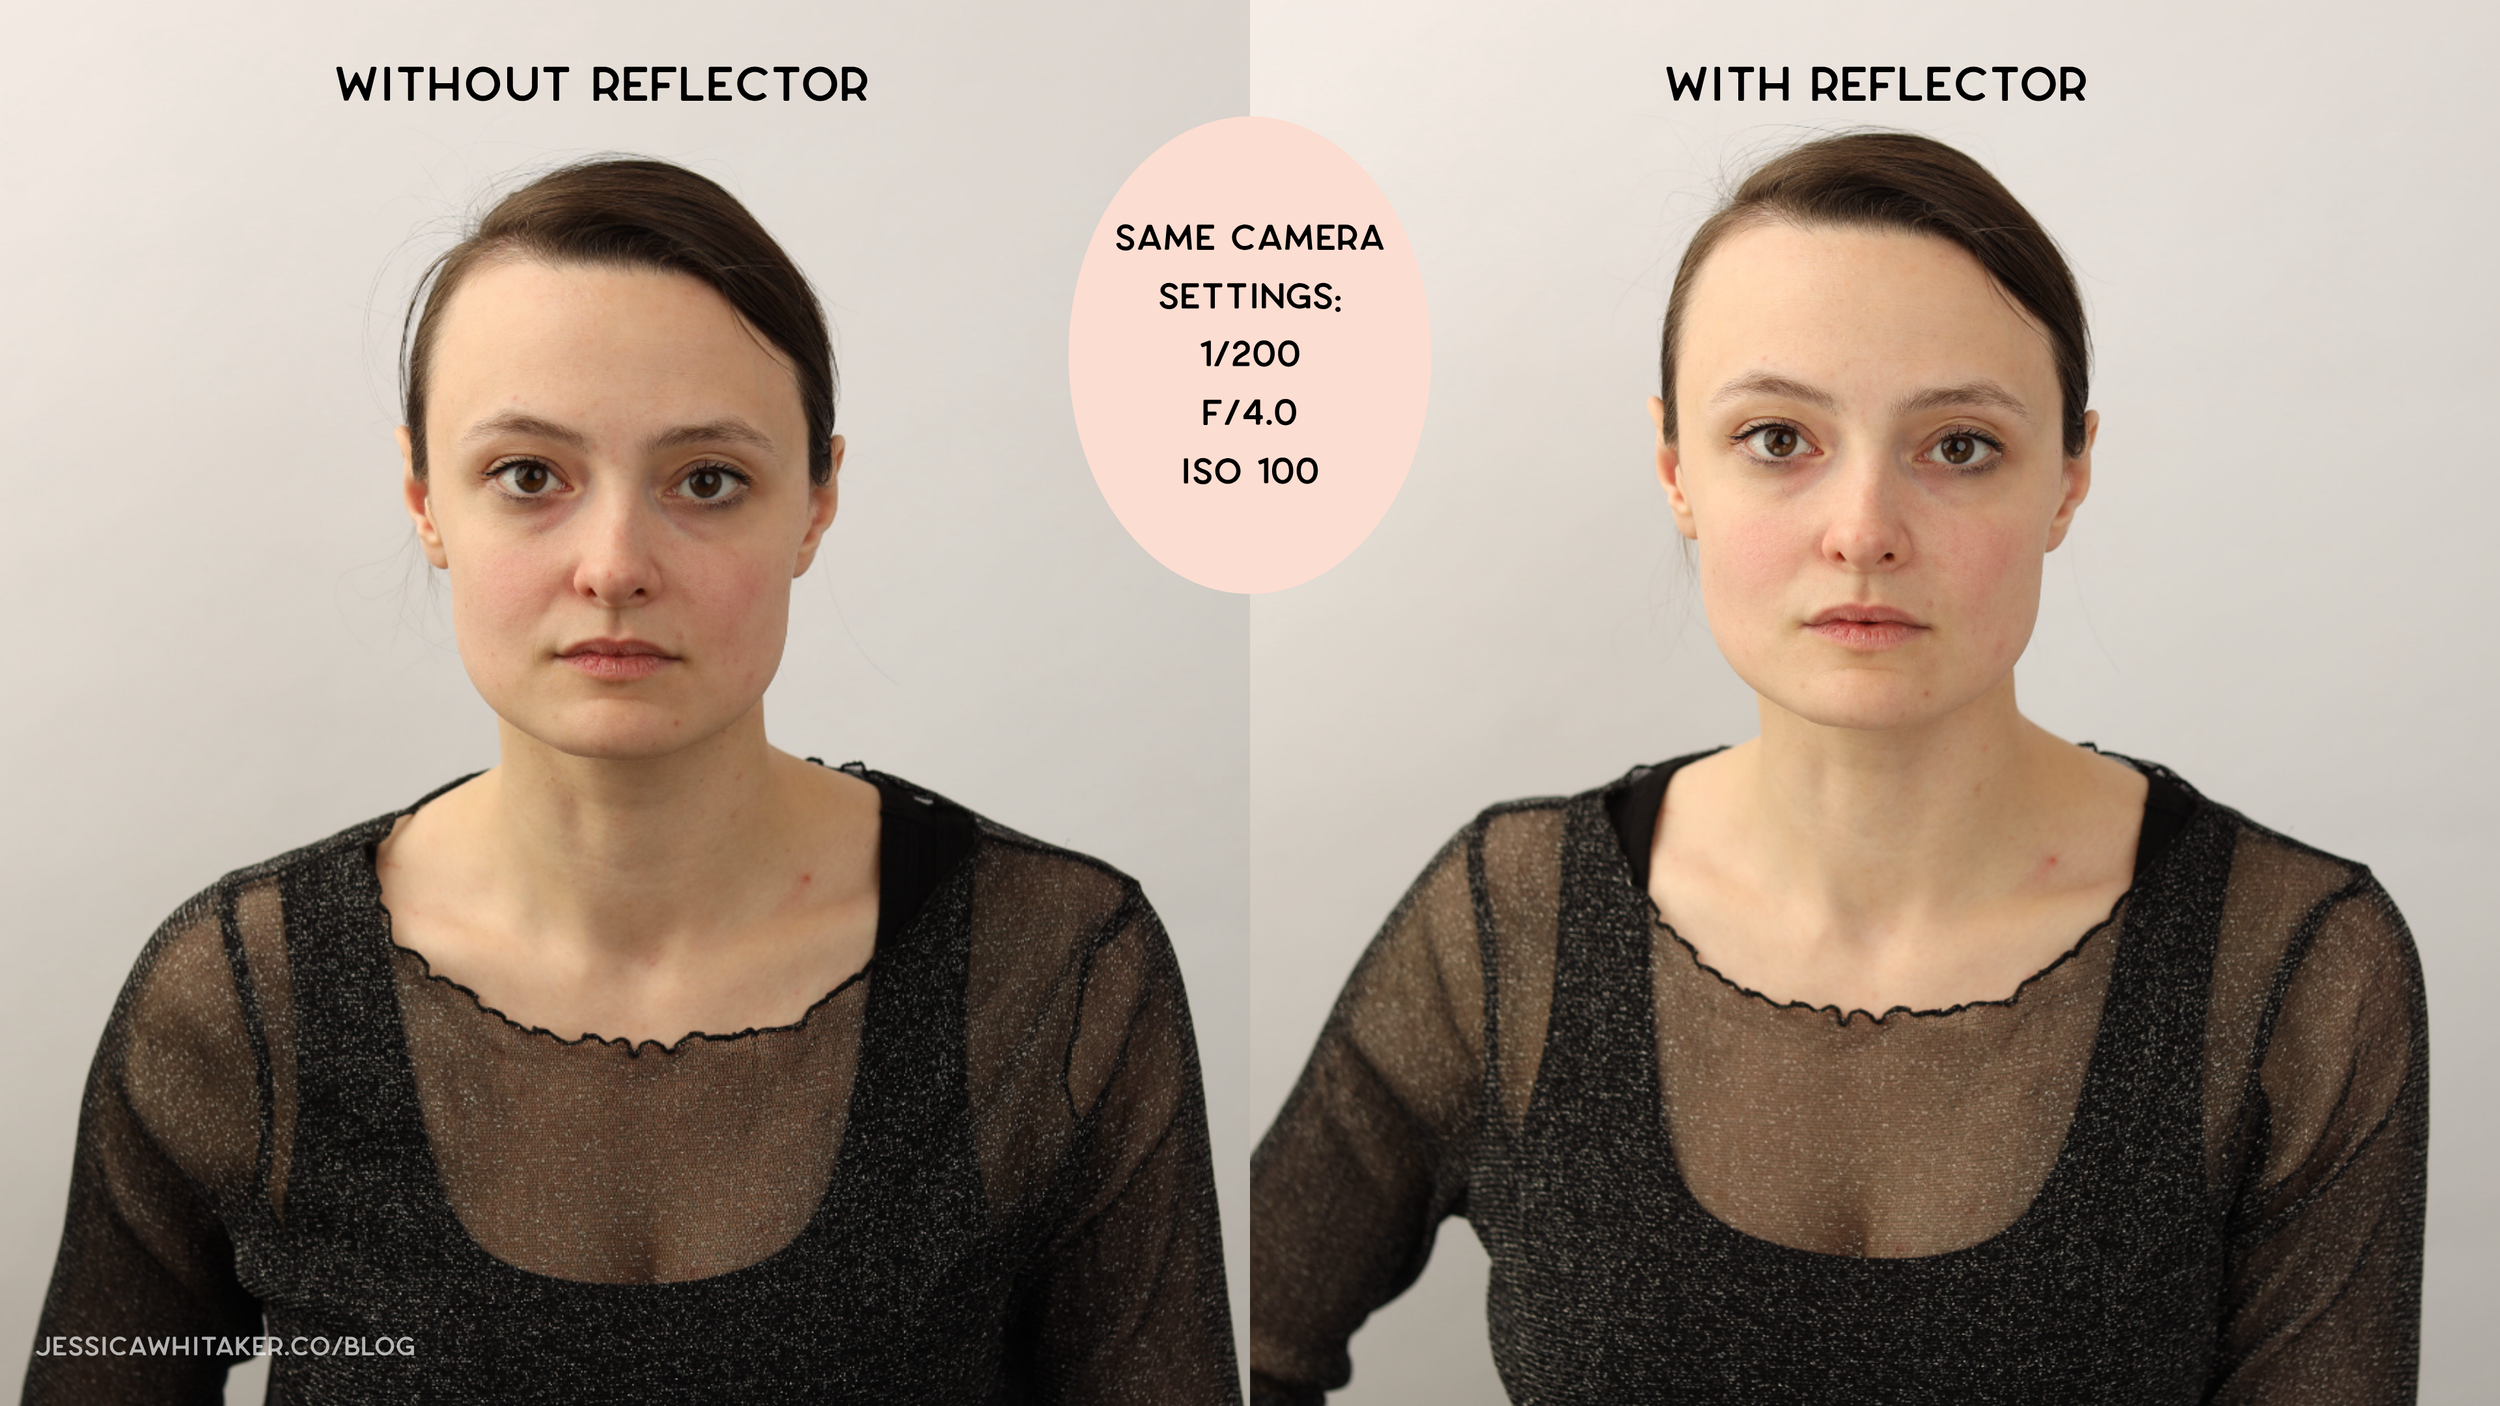
Your light is usually positioned above your subject's eye level, which means the shadows fall downward, into the hollows under the eyes, under the cheekbones, and under the chin and jaw. Those are exactly the areas that make people look tired in photos. A reflector placed low, in front of your subject, catches the light and bounces it back up into all of those shadows, filling in the under-eyes and softening everything under the chin. It's like a built-in retouch before you've edited a single thing.
And if you're only planning to buy one light, the reflector isn't optional, it's key. Think about what it's actually doing, it's sending light at your subject from a second direction. That's the job of a second light. So a one-light setup with a silver reflector is about the closest thing you can get to a two-light setup without buying a second light, and the reflector costs a fraction of one.
A Practice Tip for Shooting Non-Models
This trick is as old as YouTube itself. The original beauty gurus figured this out years ago, you know how their faces always looked so bright and flawless sitting at their filming desks? A lot of them had a silver reflector, or literally tinfoil, laying flat on the desk in front of them, bouncing light back up into their faces the entire video. So here's your practice tip, especially if you're shooting friends and family who aren't models and might feel a little awkward: sit them at a desk or a card table, lay your reflector silver side up flat on the table in front of them, and shoot. The table does the holding, your subject has somewhere natural to put their hands, and the reflector fills their face with light the whole time. And if you don't have a reflector yet and you're feeling scrappy, tinfoil works.

You're going to see exactly what this looks like in the studio section below, because in almost every setup I'm about to show you, I took the shot with the reflector and without it, so you can see the difference with your own eyes. Once you see it, you probably won't shoot without one again.
Studio Lighting Setups: Step-by-Step Examples
Now let's get into the demo portion. I highly recommend watching this part on YouTube, since it's only about five minutes of the full video, and I think you'll learn even more from watching it in action than just reading through it. And a big thank you to my subject, PJ, for modeling for me. It’s also worth mentioning that the sample images I am going to share are completely unedited and not retouched.
Setup 1: Two Lights, Side by Side
For this first setup, I used two lights placed side by side with a small gap between them, both pointed at my subject. I shot it twice, once without the reflector and once with the silver side of the reflector bounced back in, so you can see exactly what that one extra piece of gear does.

Camera settings for both shots below: 1/125 shutter speed, f/2.2, ISO 100, nothing changed between them except the reflector.

Setup 2: Two Lights at an Angle
This setup also uses two lights, but instead of side by side like the first setup, one sits next to me, angled toward my subject, and the other sits off to my model's left, in line with where she's sitting. Same as the other setups, I shot it once without the reflector and once with the silver side bounced back in.
If I wasn't limited by my ceiling height, which only goes up to about eight feet in this room, I would have raised that second light much higher and pointed it more directly down toward her, almost like an umbrella straight overhead. That's another option worth trying if your ceiling allows for it, but this angle works well too.

Camera settings for both shots below: 1/200 shutter speed, f/4.0, ISO 100.

Setup 3: One Light, Straight Behind Me
This one's a favorite of mine, and it's a great example of a true one-light setup. The light is positioned directly behind me, raised as high as it can go, and I'm standing right in front of it facing my subject. Again, I shot it both without the reflector and with the silver reflector bounced back in.
Camera settings for this one: 1/200 shutter speed, f/2.0, ISO 100, same for both versions below.

Even with just one light, that reflector is doing the job of a second light source, bouncing light back up into the shadows my one light left behind. It's the setup I'd point a beginner toward if you only want to buy one light to start.
Frequently Asked Questions
What's the difference between a flash, a strobe, and a studio light? They're the same category of equipment. Flash and strobe are two names photographers use for a light that fires a short burst timed to your shutter, as opposed to an on-camera flash, which is the small built-in or hot-shoe flash attached directly to your camera.
Do I need one studio light or two to get started? Two lights give you more flexibility, but one light paired with a silver reflector is a completely legitimate way to start, since the reflector does the job of a second light source for a fraction of the cost.
What camera settings should I use with studio lights? A solid starting point is shutter speed at 1/200 or below (your sync speed), ISO around 100 to 200, and aperture based on your personal preference. From there, you only adjust your light's power based on a test shot.
Is it hard to transition from natural light to studio lighting? Not really, and you don't have to give up the look you love. Used well, studio lighting can replicate the same soft, window-light look you already shoot, with the added benefit of being available regardless of weather or time of day.
What's an affordable studio flash for beginners? The Geekoto GT400 is the one I use and recommend, it runs about $389, includes a built-in battery and receiver, and a full two-light setup with umbrellas and a transmitter comes out to about $1,118, competitive with corded systems that cost about the same before you even add a battery pack.
Can I mix different brands of studio lights in the same shoot? Yes, using a setting called optical sync (sometimes labeled S1 or S2), which triggers a light the instant it sees another light fire, without needing to be on the same channel as your transmitter.
What does a reflector actually do? It bounces light from your studio light back onto your subject, filling in the shadows that naturally fall under the eyes, cheekbones, and chin when a light is positioned above eye level.
Final Thoughts
Studio lighting only feels complicated until someone breaks it down without the jargon, and that's really all this post is meant to do. Once you've got your channel set, your letters assigned, and a reflector in your bag, you're not learning anything new every time you shoot, you're just adjusting one dial and taking the photo. Everything above is also walked through step-by-step in the full video, including the live studio demo, so if you'd rather watch it in action, watch on youtube here. And if you try any of this out, I'd love to see how it goes, drop a question in the comments or send me a DM on Instagram.
If this made studio lighting feel more approachable, you'll probably like a few of the other breakdowns on the blog: